5 Jun 2015

Kitchen Island love

WOW!  Our kitchen continues to draw attention, featuring on thekitchn.com (for more of my posts see A sustainable kitchen, kitchen progression, kitchen installation, kitchen reveal).  It's the moveable island that is the star of the show today.  


Once Sam, from Sustainable Kitchens, and I had the initial design and layout sorted out, I was able to start thinking about the details of 'what and where'.  I imagined using the kitchen and where I would ideally like to store things and how I would use the space.  

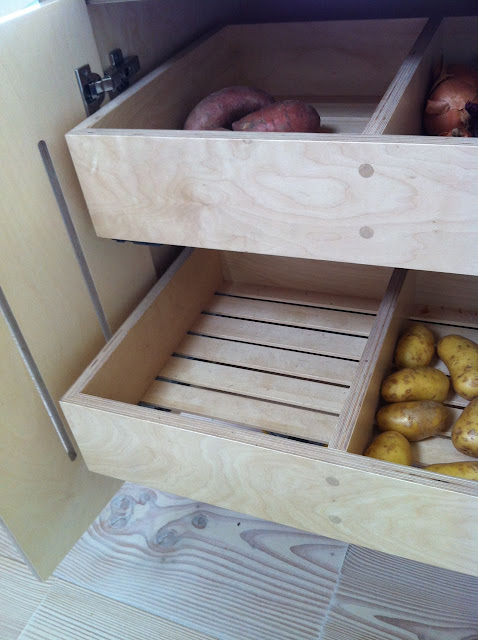
The island quickly got identified as the 'prep' area.  So all mixing bowls, sieves, weighing scales, measuring jugs, lemon juicer, etc. would be stored here.  Sam pointed out that we would be able to have storage on both sides of the island. I had been very keen on the idea of a breakfast cupboard, where all breakfast foodstuffs, cereals & jams/marmite/honey could be stored conveniently close to the dining table (mornings are busy enough!).  This meant that I could use the other cupboard for vegetable storage.  I wanted it to be dark but also ventilated so Sam suggested cutting vents into the doors- the design of these was left until as late as possible so that we could relate it to other design choices in the rest of the house. 


The island still in the workshop waiting for the stainless steel wrapping.


We looked at baskets and got a little sidetracked by metal/wire industrial style trays, but in the end I really liked Sam's idea of just making the slatted drawers from ply like the rest of the carcass of the kitchen.  This was the first time Sustainable Kitchens had been asked to make this feature and they made two drawers with dividers to give me 4 different areas.  This has been really was useful esp in the autumn/winter when we have squash, celeriac, beetroot, jerusalem artichokes and so on.


5 May 2015

Our cotswold dry stone wall

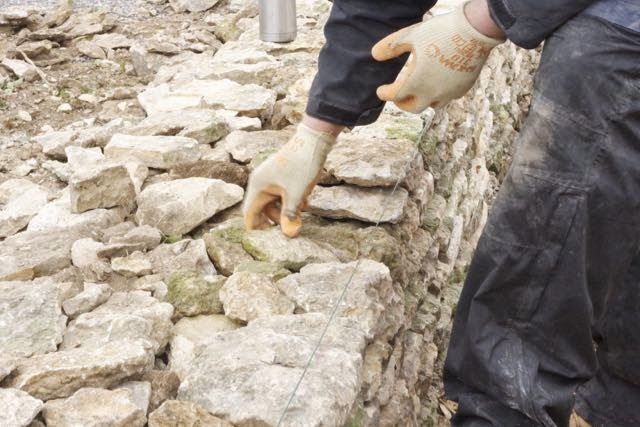
Our poor neglected entrance...We had inherited a very dilapidated cotswold dry-stone wall.  It was falling down, and had a huge hole in the upper part where the services had been trenched onto site.


We had very mixed feelings about the wall.  Cotswold stone is very pretty but is not an ideal building materia, with frosts it cracks and every winter loads of walls simply fall down.   Also building a new wall was going to cost a small fortune, and the money was all gone...  

Luckily Jason came to the rescue.  The stone from our old wall was weathered already and the creamier colour was much nicer than the newer bright yellow stone.  We decided on a much lower height as I would also be planting a yew hedge behind which will eventually screen us from the road (oh, I daydream about my cloud-pruned yew hedge!).


Jason first cleared the earth bank which was behind the wall, it revealed that the original wall was pretty deep.   Then the stone was sorted and up we went again.


I love the weathered colour and shapes.  God bless Jason, he worked miracles with stone that others had declared useless.  It was not an easy job but he persevered.


We designed a name sign which had rods attached to the rear that we could fix into the wall.  We contacted Emsea, a local laser cutting firm in Tewkesbury which had been highly recommended by a friend.  They made a very nice sign, they were a little unsure about the undressed metal but I assured them that it matched the house - we don't do shiny & polished!


The wall is probably half the height of the original.  We went for a really flat cement top which looks very smart. It looks fab - we've had loads of compliments on it.  It's also less likely to fall down. 


The yew is in!  What a labour of love- Dad and I spent a week digging out the bed with the use of a crowbar and kango to break out the solid rock.  You can see some of the larger stone piled at the back - there was a lot!  We've got enough to build another wall now...


4 May 2015

Blog overload!

I'm soooo sorry for the blog cascade.  Why the sudden flood of information?  A deadline of course.  For those that don't yet know- we are going to be on TV tomorrow, or today if this gets sent out in the morning.

Building the dream, More4, 9pm.


Nobody told me my feet were going to be in the shot...elegant crocs!


We will see it for the first time at the same time as everyone else...

See you on the other side!

the entrance

For a long time we looked liked this...


Then Andrew and Paul built this...(cedar again)


Then we levelled the driveway, yours truly driving the roller...


Next came the gravel...(the horrid paving slabs were begged and borrowed to satisfy Building Control rules and get signed off.)


Dimitri constructed the raised beds on either side of the entrance...


And the entrance pathway was laid...slate tiles


The gabions

Two of our garden boundaries were in a terrible state. Our site had been left untouched for a number of years and the plants had taken over to create a Cotswold jungle along the edges! Not only that, our hilltop position meant that the ground fell away steeply in both directions.  With the landslips of the previous winter (read more here), and potential water run-offs, it was vital that we stablised the ground and protected our lower-sited neighbours.  Gabions were the obvious solution and Ali, our friendly local groundworker was back on site to get them sorted. 


Clearing the jungle


Clear and level 


I love gabions!  I love how they look and they are super sustainable too -

  • they are constructed of locally sourced materials minimising transport emissions and costs
  • they have a lower environmental cost than concrete and other construction materials
  • they are permeable to water and don't allow a build up of hydrostatic pressure behind them
  • the baskets are flexible and the structure can adapt flexibly to forces occurring as a result of soil movements occurring after the construction of the gabion wall
  • winter freeze and thaw conditions have minimal impact to the structure
  • they can be easily colonised by plants leading to a 'green wall' and very naturalistic aesthetic
  • the stone can be reused if a repair is needed unlike a normal concrete solution


The central gully is to allow extra planting space above.


Topsoil spread and levelled with the rest of the 'garden'.


That was the relatively easy gabion wall done.  Now for the more extensive and expensive one...


The gabions were the reason our finances became so tight at the end of the project.  We had verbal agreement from our lender of further funds, so we went ahead with the work.  Our lender later changed their mind, and so money allocated to other work had to be re-distributed.  It was very challenging at the time, but when we look back we had no choice, this work had to be done.  They were a huge unforeseen cost of about £30K in total.  The shortfall of funds has meant that the house hasn't yet been completely finished. Things will come gradually now over the next few years - it's teaching me patience!

Everyone is delighted with the gabions.  There have been a lot of gabions appearing in this area recently and I have to say ours are definitely the best looking - Ali knows how to make a nice, neat gabion.  Retrospective planning permission was granted with no issues at all (we had had someone call planning enforcement...!). Just a shame I don't get to see them.

Finishing the Stairs

To finish the stairs there were a number of elements.  We wanted a glazing balustrade at the top of the stairs, to span the width of the stair return.  Obviously we wanted as clean and simple a look as possible, ideally floating and frameless.  Charlie forwarded me a gorgeous photo example but it came with a £1000 price tag!  No chance, all the money had gone!  But Charlie regrouped and came up tops when he found local firm Aluminox.  Steve of Aluminox recommended his side-fixing frameless channel system.  


Once the channel and glass were installed we clad the exterior in more Dinesen Douglas Fir for a seamless look.  We've also hidden an LED strip to downlight the threshold of the stairs.


I eventually found the time to lye and oil the Dinesen Douglas staircase (see What a beautiful floor).  The lye lightens the floor and prevents the orange colour developing.


As a handrail is a Building Control requirement I quickly had to come up with a design.  


Done!


The sliding doors

The sliding doors were made in the workshop, like the majority of the birch ply joinery and then transported assembled to site (see Internal joinery)


They are very big and very heavy.


Lovely simple, clean lines.  Unfortunately none of us had taken account of the fact that we had created a finger guillotine.  So retrospective action was taken to make a cut out, so that everyone can keep their all their digits.


Cedar Cladding- fully dressed now!

The slates were on, the scaffolding gone, we were on to the timber cladding.  


I'd got a great price from Hillbarn Sawmills, based in Snowshill further north in the Cotswolds.


Andrew and Paul got on with putting on the Tyvek UV façade.  It’s a vapour permeable water proof membrane.  The cladding design is a rain screen and has spaces between the planks, so the membrane will be visible which is why it has to be UV stable.  


The house looks super-cool with a black skirt, we all had a moment of wondering whether black would be the way to go...


Andrew insisted on less easily available red treated battens which he swears will last forever, the standard green battens are a lesser grade of timber.  Yours truly stained them black -now that I was living on site Andrew put me to use where ever possible!


Charlie's original concept was that we could have the planks cut from cross sections of trees, and we could minimise any cutting waste by having all different sizes of planks.  Lovely idea, and I really liked the fact that the planks would all be different widths.  Reality was different though, saw-mills told me that that is just not how it works, they rarely process a whole tree like that and given than the timber needs to be dried it wasn't going to be realistic option.  They just wanted to know what dimensions I wanted and the quantities of each.


Looking at the random width layout


 Andrew begins the fixing using the more pricey stainless steel screws and cups, necessary as cedar sap corrodes anything else.


It was Paul that did the layout and fixing and he'd found his calling, he'd got a really good eye for it.


 Beautiful!  Over the next couple of years the cedar will silver.  The planks are 50mm thick, really solid and I'm told will outlive me.